


I had this past Friday off due to the 4th of July, and I wanted to try something exciting just in time for summer. I set out to make a Pneumatic Water Balloon Cannon, and here’s the process I took.
The two sources I used to help me build my cannon were, “Backyard Ballistics“, a fantastic book on spud guns and more and “Havok“, which is ultimately the design I ended up closest to. Backyard Ballistics is just a good source of info, but their design for their Pneumatic Cannon was in a T shape, which I didn’t particularly like.
You can really be pretty flexible with the design, it just really depends on what parts you can find, or what you might have readily available. I had some difficult finding some of the parts, but you might have better luck. If you can’t find something you’re looking for, try to be flexible if possible. Also, when looking at PVC pipe be sure to check the pressure rating on the pipe as you don’t want anything exploding under pressure. Mine were rated at 280 PSI @ 70°F, but you shouldn’t have to ever worry about going that high.
Ultimately if you follow the instructions for the Havok, you should ultimate end up pretty close to what I have.

Above you can see the general layout of most everything. It may help if you match up your parts with this picture to be sure you have everything, and double check to see if it is in the right place. If you want to cut up the PVC pipes at the store, here’s the lengths I used for everything. Otherwise you can wait until you get home and use a hack saw or a table saw.
- 1x 23″ – 2″ PVC pipe (this will be your compressed air chamber)
- 1x 32″ – 2″ PVC pipe (this will be your barrel)
- 4x 2″ – 1″ PVC pipe
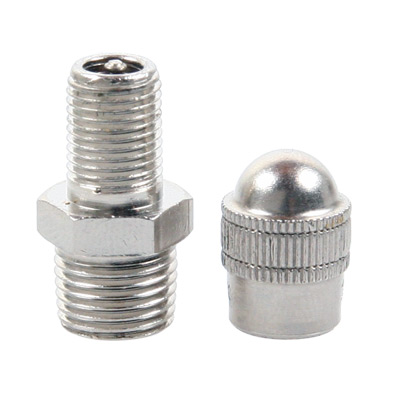
I had some difficulty finding the parts. I looked nearly everywhere for a schrader valve, but no one had one. I eventually found one at Napa Auto Parts, so maybe you might have some luck. It looks like this if you want to be sure you get the correct thing. The 2″ to 1″ adapter was also difficult to find as neither Home Depot nor Lowes had the appropriate parts. I eventually ended up finding some adapters at Tractor Supply Company, so you might could try that.
 Surprisingly enough, the gun works very well even at somewhat low PSI. I went out to a football field to do some range testing and was consistently getting 60-70 yards between 55-60 PSI. We tried to shoot even further at higher PSIs, but we were having some difficulty with the balloons bursting. Once I returned home, and with further testing I found out that I was using too small of a bag as a wadding and was able to shoot with a higher PSI once I used a larger bag as wadding.
I also had a lot of left over pipes, so I may experiment as well with some shorter cannons, or even a completely different design. Even though this one looks finished, I may have a few more things I want to do with it. I noticed that the barrel and the compressed air chamber were a little wobbly, so I may put a brace out on the end to help stabilize things.
While not the most impressive video, here’s a small demonstration of the cannon. I believe this particular shot was around 30-40 yards away, but I’ve been able to reach well over 100 yards with some shots.