


I’ve always been frustrated by the speeds & limitations of wireless and with the addition of a home server, 802.11G just doesn’t cut it. Sure it’s great for flexibility but there’s certain limitations when you want to stream content. Now that I own my own home, I can do something that I’ve wanted to do for a long time – setup a wired home network.
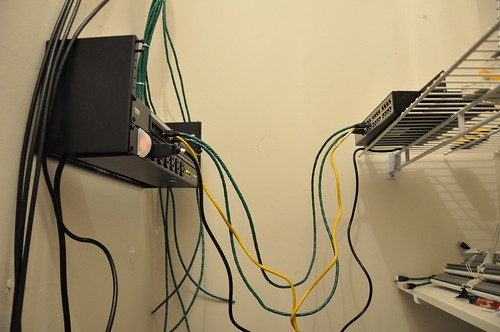
The existing cable wiring was a mess, running from outside to the garage (on the opposite side of the house) then out to each room. I wanted a more convenient location for my wires, so I pulled all the wires from the garage into a closet close to the outside wall where the wires come in.
I tried to run lines where there was already cable/phone outlets so I wouldn’t have to cut too many new holes in the wall. Ran about 3-4 CAT6 drops per room.

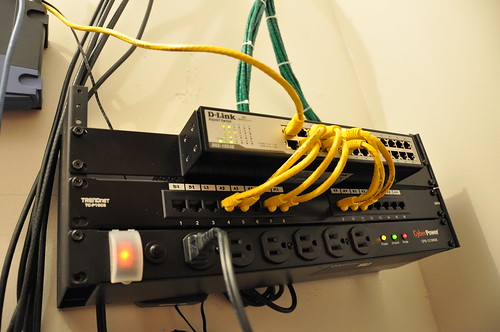
I bought a 16 port CAT6 patch panel, although I’m already wishing I had picked up a 24 panel just to be on the safe side. In addition, a 4U wall mount bracket and a rack mountable surge strip.
Most of the materials weren’t too expensive, aside from the 1000′ of solid CAT6 cable and 1Gbps network switch.
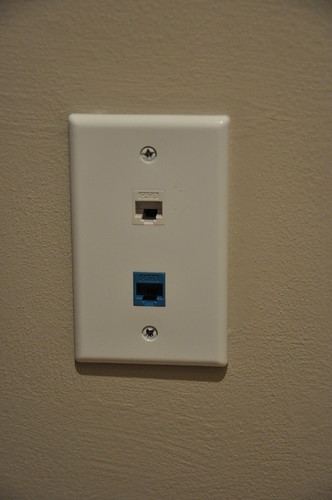
I did have to replace most of the wall plates, so picked up a bunch of 2/3 keystone plates with various CAT6/Coaxial connectors. I did use blue to signify what is supposed to be a phone line, but I don’t currently have any of those actually hooked up at the moment.
I do plan on fixing up the phone/coaxial parts at some point, but I’m honestly in no rush considering I don’t have cable/antenna/phone hooked up.
I didn’t have any kind of fancy label maker, so I simply used white electrical tape and a permanent marker to label the wires on both end should I ever find the need to figure out what’s what.
It was a decent amount of work, but all in all I’m pretty happy with it. My 1Gbps network happily chugs along at 30-40MB/sec, although I’m sure it’s a bit slower than I expected due to my HDD read speeds.
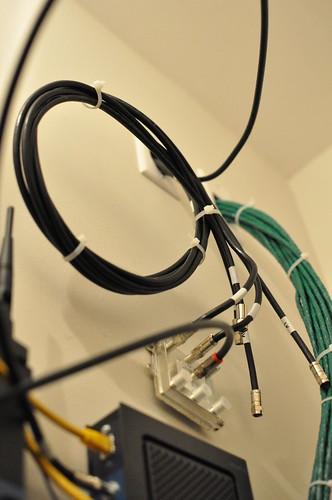
Update – Cable/Antenna RG6 Wiring
After months of procrastination, I finally terminated the dangling RG6 cables and hooked them up to a home-grown antenna. I used up a DataShark compression kit from HomeDepot to terminate the cables. However if you use the same kit, I really would recommend picking up a coax stripper as the one included was pretty crappy.
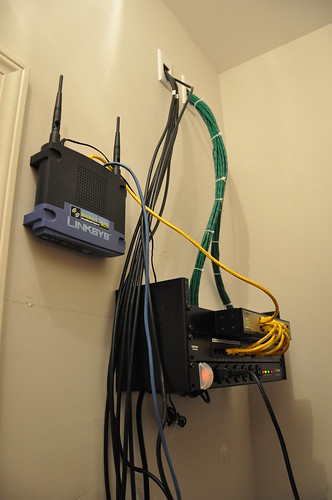
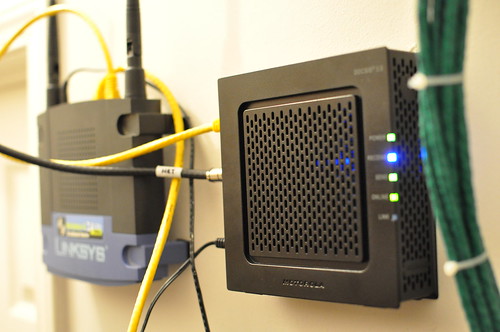
In addition, picked up a new Motorola SB6120 modem which was capable of wall mounting:
Sure the wires aren’t exactly neat but the setup does what it’s supposed to do. Simplified management of my home network and easy access should I ever find the need to change anything.
Jason, I just wanted to thank you for the pictures. Great job. Do you recommend any particular suppliers?
Bob
Most of the wiring/panels came from Monoprice.com. Other than that I think I used NewEgg for the switch.
As a side note, I did try to make my own patch cables from the extra wire that I had but without the proper tools and know how you’ll end up with too many failures. I just ended up buying a bunch of varying length cables from Monoprice for about $20.
Great post – Thanks!
A friend of mine asked me to help network his new office and I just happen to come across your blog.
I know you mentioned 24 port patch panel, but I thought it was strange for you to have a 24 port switch and then only buy a 16 port patch panel!
Yeah, I’m kind of regretting the 16 port patch panel now. But it is what it is. I still think I managed to have about 3 drops per room.
But another reason why I bought a 24 port switch was because the price was a negligible difference between 16/24 at the time.
Thanks for the images. I don’t see your cable modem and your cable splitter setup. Do you mind to take a picture and share that as well? Thanks.
Just wanted to say your install looks very neat. Very professional. Must be easy to work on.
My own is still a mess. A work in progress, partly becauase I bought one of those leviton media cabinets with the small integrated patch panel. What a mistake. Your approach is soooo much better!
You’ve inspired me!
-Mike
Hi there, interesting setup. Mind if I ask – do you have any issues with cooling / heating? Do you have any sort of ventilation set up in your wiring closet?
I am doing this same thing, finishing my basement.
Taking a 2 by 2 by 8 space and moving all my networking and video equipment/cables.
monoprice.com for sure for all your needs.
newegg.com for a good 24 port gigabit switch. I’m getting the DGS-1024D Rackmountable Switch
I link what you did for your cables to come into the room. I think I will use some pvc tubes and go in from the ceiling.
Thanks for the pictures, it is helping me out!
Jason-
I’m new to home networking but I am building a house and having the builder put network drops in all the rooms as well as two in my media cabinet. All the wires will terminate in the basement with the cable. I know that I need to connect the cable to by modem and then modem to router, but I’m still not sure I understand the role of the switch and patch panel. Can you please explain. Sorry if this sounds like a dumb question, but I’d like to do this myself and not pay someone just to plug in a few cables.
@Bobby The patch panel isn’t necessarily required, as you could plug all your connections directly into a switch/router. However, it makes things a little bit simpler and easier to manage those connections. I may not need everything plugged in at once and having a patch panel makes it easy to switch any of the patch cables.
If your router has enough connections for your home network, a switch doesn’t have to be used, you could just plug everything into your router (since it should have switch functionality built in as well). However, part of the reason why I used a switch is my router doesn’t have enough connections, and my router only allows network traffic up to 100Mb/sec. If I’m transferring files internally, by using a switch that allows up to 1Gb/sec transfer I don’t have to go through the router and have my speed limited. Hope that helps.
I like what you’ve done, its good you have future proofed it. Ive seen some where they have put a port on each room and a few months later then have to put a switch in the room to give more ports.
This may be an extremely basic question but what exactly is the purpose/advantage of the patch panel? What’s the different between your type of setup and a setup that just has a switch? Everything else makes sense to me, I’m just not understanding the relationship between the patch panel and network switch.
Jade Communications did a great job with the wiring in our home. They were terrific and very professional. Nice guys, very trustworthy, and a great recommendation for anyone in Boca Raton. Check them out at http://www.jade-com.com/.
I liked your setup so much, I modeled mine after yours. Can I send you a few pictures that you could add to this blog? They might inspire others.
Also I ended up with an extra rack and shelf if anyone is interested.
Hi Jason
I am building a new house. we want to have internet wire in each room and living rooms. The builder recommend to move everything in the basement. Your illustrations help me understand a lot. However, I do have a naive question: we would like to have moden, router, and switch in the great room on the first floor, so we don’t have to go down basement to reboot. Is it possible to do this way? Thanks in advance.
Wayne
@Wayne, Your switch needs to be wherever your drops converge so unfortunately that probably couldn’t be in your great room. Your modem would of course be where your connection is (dsl, cable) – but it in theory could be anywhere. Your router could be anywhere of course since you could just plug it into a wall outlet and route it to the modem through your switch. Hope that helps!
Very appreciated, Jason for prompt answers. I still have one naive question: is it the correct sequence of connection: the internet– modem –router– switch. If it is, I have to put modem and router in the basement, right?
Is it anyway to have one wire, pre-wired from great room to the basement, then to the switch?
Many thanks
To clarify the 2nd question, the wire from the greatroom to the basement is used for connection between router and switch. thank you.
It’s generally modem > router > switch. Now using a patch panel, you could patch your connections appropriately based on where you have your modem/router but the switch always needs to be behind the router.
On the 5th photo, the bottom one is the patch panel. So if you were using that, one of those could connect from your great room directly to the modem, or cross patch to whatever your rooms your modem and router are in. From there, you could take whatever connection out of your router and patch it back into your switch. Hope that all makes sense!
Thanks again, Jason. The great pic makes a lot of sense. The D-link is the switch, right?
So, I have two choices (I have 23 cables in different locations through the house, I use a 24 patch and 24 switch):
1) wire back all 23 cables back from the panel in the basement to great room where my modem and router are, and connect to the switch.
2) I need to find another wire which runs from great room to the basement. It will be used to connect the router in the great room to the switch in the basement. Thus, I can copy your connection from patch to switch.
The second choice appears less cost, but I am not sure if it is practical.
I will be very appreciated if you can help me to clarify and help me to make a choice.