Home Network / Wiring Closet

Saturday, March 19th, 2011 @ 5:31pm

I’ve always been frustrated by the speeds & limitations of wireless and with the addition of a home server, 802.11G just doesn’t cut it. Sure it’s great for flexibility but there’s certain limitations when you want to stream content. Now that I own my own home, I can do something that I’ve wanted to do for a long time – setup a wired home network.

The existing cable wiring was a mess, running from outside to the garage (on the opposite side of the house) then out to each room. I wanted a more convenient location for my wires, so I pulled all the wires from the garage into a closet close to the outside wall where the wires come in.

I tried to run lines where there was already cable/phone outlets so I wouldn’t have to cut too many new holes in the wall. Ran about 3-4 CAT6 drops per room.

Wiring Closet Beginning

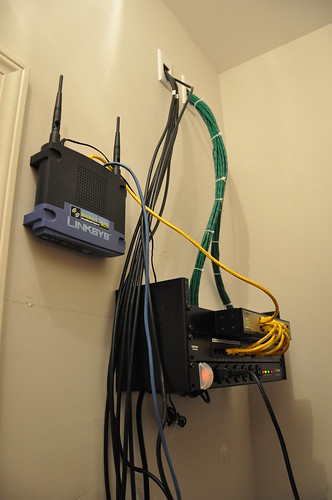
I bought a 16 port CAT6 patch panel, although I’m already wishing I had picked up a 24 panel just to be on the safe side. In addition, a 4U wall mount bracket and a rack mountable surge strip.

Wiring Mess

Most of the materials weren’t too expensive, aside from the 1000′ of solid CAT6 cable and 1Gbps network switch.

Panel

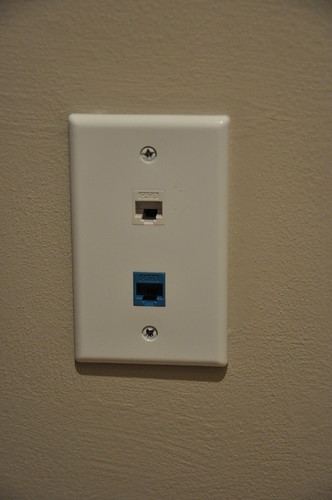
I did have to replace most of the wall plates, so picked up a bunch of 2/3 keystone plates with various CAT6/Coaxial connectors. I did use blue to signify what is supposed to be a phone line, but I don’t currently have any of those actually hooked up at the moment.

(Almost) Finished Closet

I do plan on fixing up the phone/coaxial parts at some point, but I’m honestly in no rush considering I don’t have cable/antenna/phone hooked up.

Patch/Wiring Panel Close Up

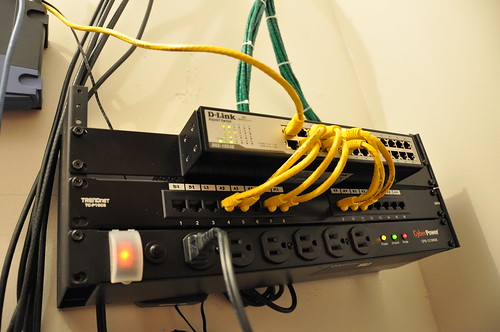
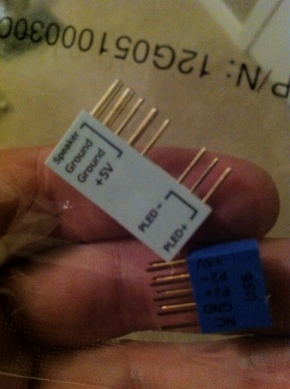
I didn’t have any kind of fancy label maker, so I simply used white electrical tape and a permanent marker to label the wires on both end should I ever find the need to figure out what’s what.

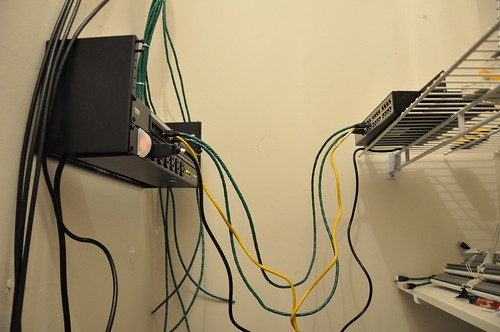
It was a decent amount of work, but all in all I’m pretty happy with it. My 1Gbps network happily chugs along at 30-40MB/sec, although I’m sure it’s a bit slower than I expected due to my HDD read speeds.

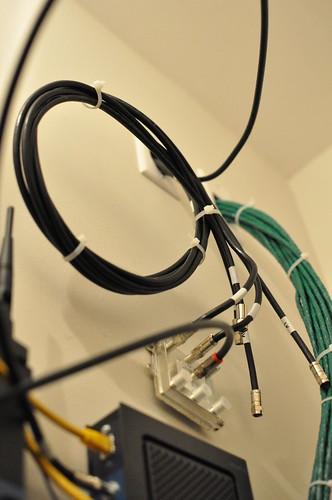
Update – Cable/Antenna RG6 Wiring

After months of procrastination, I finally terminated the dangling RG6 cables and hooked them up to a home-grown antenna. I used up a DataShark compression kit from HomeDepot to terminate the cables. However if you use the same kit, I really would recommend picking up a coax stripper as the one included was pretty crappy.

Cable Wires

In addition, picked up a new Motorola SB6120 modem which was capable of wall mounting:

Mounted Router & Modem

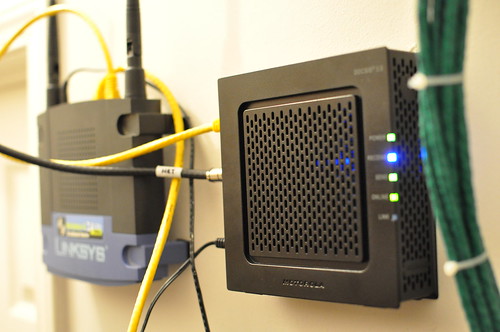
Sure the wires aren’t exactly neat but the setup does what it’s supposed to do. Simplified management of my home network and easy access should I ever find the need to change anything.

New Rig

Thursday, October 21st, 2010 @ 10:10pm

It’s that time again, time for my 3 year upgrade! My computer performance has been a little more sluggish than I would like, so I’ve been watching NewEgg for some deals for a little while and finally bit the bullet.

  • AMD Phenom II X2 3.3GHz
  • MSI NVidia 460 GTX 1GB
  • ASUS M4A79XTD AM3

Shown below is the motherboard that I picked up.

ASUS M4A79XTD

I had a socket AM2 board, but unfortunately my old board did not have a bios update that was compatible with a newer AM3 chip. Unfortunately in addition to the board that meant I had to upgrade from DDR2 to DDR3.

One thing that I really liked are these extension modules that go between the board and various wires. I know you only have to connect wires only once or twice, but it’s nice to have some space to work.

Chips

Thankfully, having this on the board will make my return trip slightly easier. My room eerily glows blue as if orcs draw near at night, so I definitely plan on removing whatever wire makes that happen.

I’ve only had a day or two to play around with it, but I do plan on attempting to unlock the other two cores at some point and test for stability. I’ll be pretty pleased with my purchase if I can manage to get at least 3 cores running stable with a slight overclock.

Installing Ubuntu 10.04 w/ RAID 1 and GPT

Thursday, September 16th, 2010 @ 9:05pm

After spending several days of pain and frustration over trying to get RAID 1 working with Lucid Lynx and GPT, I finally got it working. Maybe this will be of use to someone else.

I initially tried following steps from here, but was unable to get the system to boot correctly. Eventually I stumbled upon this article which allowed me to get the boot loader working correctly.

Apparently between MSDOS partition tables and GPT, MSDOS automatically reserves a portion of the hard drive for the boot loader while GPT doesn’t. I guess the advantage of having GPT do so is that you can place it anywhere on the disc, although I would imagine you would want it near the beginning anyway.

You can follow either the graphical installation shown here or use the alternate cd to install 10.04, but the most important thing is that you leave a very small partition (bios_grub in order for the boot loader to handle things correctly. You can do this directly from gparted or run it on the command line like so:

$ sudo parted /dev/sda set bios_grub on

I haven’t tried configuring RAID 1 on the bios_grub partitions for each HDD, but I’m happy to leave it be as it works. Once that’s done, you can install grub manually (where sda and sdb are your respective hard disks):

$ sudo update-grub
$ sudo grub-install /dev/sda
$ sudo grub-install /dev/sdb

Additional Resources:

Honda CR-V 1999-2001 Clock Fix

Saturday, September 11th, 2010 @ 11:25am

After months of driving around with a broken clock on my 2001 CR-V, I decided enough is enough. Time to fix that stupid clock. If someone else is having a similar issue, hopefully this will help.

Tools Needed

  • Steady hand
  • Flathead screwdriver
  • Phillips-head screwdriver
  • Soldering iron
  • Solder

To access the clock, you’ll first need to remove the center air vent. Under the air vent there are four clips that go into the dashboard. Pry your flathead screwdriver under the center air vent to remove the clips and pull the unit out. The clip locations are shown below (I’m showing the underside of the vents):

center air vent

You’ll want to be careful when you’re pulling the vent out and be sure that all the clips are loosened. I accidentally broke a clip that wasn’t loose when pulling mine out.

Once the center vent is pulled out, you should see two connectors. One goes to the hazard lights, the other to the clock. You can unplug the clock and remove the two screws holding the clock in with your phillips-head screwdriver.

Be careful when unclipping the front cover to the clock, as the buttons may fall out. Once the front cover is off you should see the clock LCD and the PCB.

When looking at my clock only the far left connection was cracked, but the soldering was pretty thin as well on the others shown. I went ahead and soldered all the connections below for good measure, as I didn’t want to remove the air vents again just to re-solder.

clock

Once all your soldering is done, you can test the clock by just plugging it in and turning the ignition on. If it doesn’t work, be sure to check your soldering connections. Otherwise you can connect everything back up, and screw it all together.

Yay!

Woohoo! I now have a working clock again!

Some of you have mentioned monetary compensation. I’m not in this for the money, and not really interested in any direct donations. However if you’re still interested in giving back, you can use my Amazon associates link to buy something off Amazon, of which I’ll get a small percentage.

iPhone 4.1 and HDR

Wednesday, September 8th, 2010 @ 6:50pm

iOS 4.1 was released today, and one of the newest features is the added capability to take HDR photos. For those of you who aren’t familar with HDR, it stands for “High Dynamic Range.” What this means is the camera takes several photos in succession at different exposures and merges them together to bring out more details from photographs.

With HDR being added as a part of 4.1, I wanted to take a few test photos to see how well they turn out. Hover over the images (or click on them) to see the HDR photo:

There’s not a large difference in the above photo, but you can see a little more of the trees and the grass comes out to be closer to its natural color.

This photo is by far the most impressive result. In the original exposure the sky is a complete white out, while the HDR photo brings out the color of the sky.

…yet not every photo is as impressive. I actually find the original exposure here to be the better photo. Thankfully, iOS 4.1 allows you to save both photos – just in case!

You can see how the light washes out some of the cabinets, with HDR restoring to a more natural view.

While I wouldn’t consider my iPhone as a permanent placement for a full featured camera, it’s great to have around since it takes pretty decent photos and I’m likely to always have it on me.

New Portfolio

Thursday, January 21st, 2010 @ 8:10pm

A few days ago I revamped and relaunched my portfolio. The new site is now built upon WordPress and should help expand the type of content I put on the site. The new launch also includes a blog which will be completely separate from this blog. For friends & family, don’t worry; this blog is sticking around. I’ll be able to post about mumbo-jumbo like “jquery, javascript, css, php” over on my portfolio’s blog while keeping this one on things I find purely interesting (and non portfolio related).

If you have any remote interest in web design, or the things I post over on my portfolio, please feel free to add my portfolio’s feed to your favorite RSS reader.

Google Chrome OS

Sunday, December 6th, 2009 @ 12:06am

I’m sure most of you have used Google at some point or another. I personally use it every day, and my job would become quite difficult without Google. As you may or may not know, Google Chrome was released a little over a year ago; Google’s stab at an internet browser. It’s advertised to be fast and small.

More recently, Google has announced Google Chrome OS. Based on Linux, Chrome OS is designed for the internet, and the below video explains that concept in more detail. It’s hard to argue that the internet hasn’t taken a major spotlight on our PCs, but it’s even harder to predict whether or not a desktop os can truly survive when built around the internet. Take a look below at things to come from Google.

Download Firefox 3.5!

Tuesday, June 30th, 2009 @ 10:41am

A little over one year after Firefox 3′s release, today marks the release of the newest version of Mozilla’s browser. Firefox 3.5 promises to be faster, safer, and more customizable. 3.5 also includes new features such as private browsing (no history saved) and forget this site (remove all traces of a site from your computer). Download Firefox 3.5 today! See this YouTube video for a quick tour of Firefox 3.5 highlighting the newest features.

Wii Homebrew + USB Hard Drive

Friday, May 29th, 2009 @ 12:30am

I’ve been running Homebrew on my Wii for quite some time, which also gives me the ability to play backed up games from a USB hard drive. There’s several advantages to this; I don’t have to worry about changing DVDs anytime I want to play a game, in addition to not having to carry them around. Additionally, having the games loaded from a USB hard drive decreases the time it takes to load games.

I needed to keep a log of all the steps I had to take in order to get this functionality working, so I figured I might as well be helpful and provide a list of the steps needed to do so.

The only thing I ask is that you don’t follow these methods to pirate games. It’s wrong and it cheats developers out of money they deserve. Homebrew is there to help enhance the functionality of the system, not for free games. So please use it wisely and don’t abuse the system. It’s all on the honor system here folks.

Prerequisites:

  • External USB Hard Drive
  • Homebrew Channel already installed (See Twilight Hack if you have system 3.4 or less, Bannerbomb if you have 4.0-4.2, or LetterBomb if you have 4.3)

Step 1 – Install cIOS38 (if already installed, skip to Step 2)

  • Download cIOS38_rev14 (you can find it here)
  • Extract and rename “cIOS38_rev14-Installer” to “boot.dol”.
  • Create a folder named “cIOS38_rev14″ under the /apps directory on your SD card and copy the extracted “boot.dol” file to that folder.
  • If this doesn’t work and the installation fails, you need to download the Trucha Bug Restorer for your system. Try that and attempt to install cIOS38 again. Please note that this step may brick your Wii! I highly recommend you go ahead and install BootMii in boot2 and back up your NAND before attempting this portion. Doing so will allow you to recover should anything go wrong, otherwise you are continuing at your own risk!

Step 2 – Install a USB Loader

There are a couple of different USB Loaders available. Personally I use Configurable USB Loader, but you may want to pick a different loader that has other features you may like.

  • Follow any included instructions, otherwise you may only need to copy the extracted folder into your /apps directory on your SD card.

Step 3 – Format Your Hard Drive

You may want to partition your hard drive if you want to separate your Wii files from anything else you may have on there. Most loaders now support FAT32, but there are others that support NTFS as well. If you want to use NTFS you will need to check with your USB Loader to ensure that it supports that format as a feature.

  • If you want to partition your hard drive, you may want to try and download a partition manager like GParted. Otherwise you can use the whole hard drive.
  • If you decided to use GParted, simply partition the hard drive and format the partition you want to use as “FAT32″ and continue on to Step 4.

Step 4 – Install & Run Games

The following steps may differ depending on which USB loader you installed (I’m using Configurable USB Loader).

  • Launch the homebrew channel and your recently installed USB Loader.
  • Select “USB Mass Storage Device”.
  • Insert any game disc, and press “+” to install it. This may take some time depending on the size of the game.
  • Repeat last step for each and every game you want to install.
  • You’re now ready to play your backed up games! Just select your game, and press “A” to begin.

Some of the USB Loaders will automatically download game covers, and others don’t. If you downloaded one that doesn’t you can find them here. It’s only 40mb to download 450+ covers, so you might want to do it anyway just in case.

If you have any issues with the above steps, please be sure that you remove any and all GameCube memory cards. It seems some Homebrew stuff has issues with the memory cards in place when you’re trying to install.

I tried to be as detailed as possible and cover as many angles as I could, but I’m bound to have missed a thing or two. If you are attempting to follow this guide and are running into some issues, or I seem to be missing a vital step, leave a comment and I’ll try to address it as best as I can.

As a bonus, here’s what it all looks like using the loader I tried. Please note that the above steps will not create a USB Loader channel in your main menu, but will need to be accessed through the Homebrew Channel. If you’re interested in doing so, you can follow this guide here which outlines the steps to create a USB Loader Forwarder Channel and creating channels from games installed onto your USB hard drive.

This is only a small piece of the pie of what Homebrew offers. There’s tons of applications and utilities available, not to mention the ability to play DVDs. You can find more details and information on everything over at WiiBrew.org.

Google Chrome

Sunday, May 10th, 2009 @ 1:24pm

Google is starting an ad campaign (as seen above) to help push more downloads of Google Chrome. It’s a fast, streamlined browser and provides a nice alternative to Safari and Firefox. As a web developer, I don’t really care what browser you use as long as you use one that is helping to push standards compliance. If you want to try something new and difference, download Google Chrome today.